
I love decorating for Halloween, but I do not love buying decorations that are made from plastic, take up half the garage, or become another thing I have to store for eleven months of the year.
I also do not use the large yard inflatables. Aside from the material and electricity involved, they create extra work whenever the lawn needs to be cut.
I have always liked the look of large wooden Halloween cutouts, especially silhouettes that create a scene. But plywood can be expensive, and I do not have the tools needed to cut detailed designs from wood.
So I tried something different.
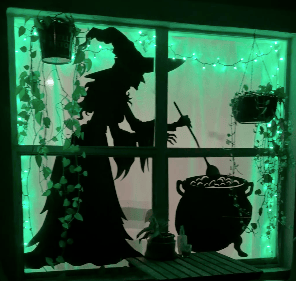
Using black cardstock and my Cricut, I created three oversized Halloween silhouette scenes for the front windows of our house. They are visible during the day, dramatic when lit at night, and can be taken down and stored almost completely flat when Halloween is over.
Halloween Décor Without the Storage Problem
Seasonal decorations can accumulate quickly.
One large decoration may not seem like much, but every holiday adds another box, tote, inflatable, sign, or plastic figure that needs somewhere to go after the season ends.
I wanted something that would make a noticeable impact from the street without adding another bulky item to our storage.
Window silhouettes solved both problems.
They use space that already exists, do not create obstacles in the yard, and still provide the large-scale Halloween look I wanted.
For the three front windows, I created:
- A witch standing over a cauldron
- A cat sitting on a picket fence
- The Headless Horseman riding with his pumpkin head raised


Creating Large Designs From Cardstock
I created the silhouette scenes in Canva, exported them as SVG files, and uploaded them into Cricut Design Space.
Because the finished designs were much larger than a standard Cricut cutting mat, I divided each image into sections that could be cut from 12-by-12-inch sheets of black cardstock.
Once cut, the sections were assembled on the windows like a large puzzle and attached using clear tape.
This was not a one-hour Cricut project.
The project took about two days, including the time I spent learning how to divide the designs, arrange the cuts, and correct a few mistakes. Someone more familiar with Cricut Design Space could likely complete it much faster.
I only use my Cricut occasionally, so much of my time was spent figuring out the software rather than physically cutting or hanging the silhouettes.
What I Learned From the First Window
The first silhouette took the longest because I did not have a good system for keeping the pieces organized.
Once several similar-looking sections were cut, figuring out where everything belonged became confusing. I eventually recut some of the pieces and changed how I divided the designs.
For the next windows, I kept each section organized as it came off the cutting mat. That made assembling the larger scene much easier.
Learning how to use the Slice and Attach functions in Cricut Design Space also helped me control where the designs were divided and make better use of each sheet of cardstock.
Another small lesson involved the adhesive.
I initially tried adhesive dots, but they were visible when looking at the windows from outside. Clear Scotch tape worked better and was less noticeable.
Making the Silhouettes Visible at Night
The black cardstock is visible from outside during the day, but I also wanted the windows to stand out after dark.
I hung white sheets behind the silhouettes to create a bright, solid backdrop. I used shower curtain rings with clips so the sheets could be hung and removed easily.
I first tried curtain sheers, but the sheer fabric made the display look hazy. The white sheets created a much cleaner contrast behind the black silhouettes.
Halloween-colored mini lights placed behind the sheets added the nighttime glow.
The result is a large Halloween display that can be seen from the street without putting anything in the yard.
What the Project Cost
I spent about $40 upfront because I purchased extra cardstock in case I made mistakes.
The black cardstock cost approximately $24 for a package of around 100 sheets. I bought two packages but ultimately used only one. In total I used about 25 sheets, including the ones I ended up trashing.
The remaining materials included clear tape, white sheets, mini lights, and shower curtain rings with clips. I already owned some of those items, so the exact cost will vary depending on what you have at home.
This was not necessarily the cheapest way to decorate a window, especially if you need to purchase a cutting machine or new blades.
For me, the value was in creating something large and reusable without buying another bulky plastic decoration. The silhouettes can be stored flat, and the sheets, lights, and clips can all be used for other purposes.
A Different Way to Think About Seasonal Decorating
Sustainable decorating does not have to mean skipping the holiday or removing everything fun.
Sometimes it simply means pausing before buying another decoration and asking a few questions:
- Where will I store this?
- How often will I use it?
- What is it made from?
Could I create the same effect using something I already own or something that takes up less space?
These cardstock silhouettes are not a perfect zero-waste project. They still required new materials, electricity, cutting blades, and time.
But they gave me the Halloween look I wanted without adding another large plastic decoration to the garage or another obstacle to the front yard.
That made them a better choice for our home.


